Showing posts with label diy. Show all posts

Monday, June 8, 2015

Fifteen minutes of crafting {polka dot clothespins}

Before I left school for the year I quickly decorated clothespins to use this fall. My first year I covered them in decorative duct tape. That was a pain. This year I just wrote had Niki write my kids' names on them in colored sharpie. That wasn't near enough fun. So for next year I decided I was going to paint them polka dotted! 
It was super simple! I used regular paint from school and an unused pencil.


I made sure to make some of my dots whole and some going off the edges so they looked like "real" polka dots. I let them dry for an hour or two then flipped them over to do the other side.
*Side note* I had them numbered with colored sharpies before I did the polka dots.  My plan is to reuse them, but we'll see how they hold up.
 
What DIY projects are you working for home or school?


Wednesday, May 15, 2013

Making Homemade Laundry Detergent

I am so cheap when it comes to some things. And apparently laundry detergent has been added to the list of things I hate spending money on. So I found this recipe (can you call it a recipe??) on pinterest and went back to the original blog to find out more. Here is the post that I used.

Her recipe is amazingly simple and that's pretty much why I chose it. I had seen a lot of recipes for homemade laundry detergent that are powder form and I just wasn't so sure that I wanted to use a powdered laundry detergent so I kept searching for a liquid version that wasn't ridiculous to make.

Here's what she says to do:


3 Tablespoons Borax
3 Tablespoons Washing Soda
2 Tablespoons Dawn Dish soap
Put these ingredients in a one gallon jug. Pour 4 cups boiling water into the jug. Swirl until ingredients are dissolved in the liquid. Let liquid cool. Then fill almost to the top with cold water. The bubbles will overflow out of the bottle.
Couldn't be an easier, right?
So I snagged up the ingredients I needed. I got them all at WalMart and spent less than $7 on all of it. I used a left over milk jug because I wasn't sure if i was going to continue making this recipe.


Add in the borax, washing soda and dawn....


Then the hot water...


Swirl it around to get it nice and mixed up, then let it cool.


After it has cooled, you just fill it up the rest of the way with cool water. Since my soap is light pink, it really looks almost clear in the jug, but I promise that there is soap in there and it works.

So far I am really happy with it. Plus it's so incredibly cheap! Our clothes get clean and they still smell nice too! 

What homemade cleaners and products do you make??

Wednesday, April 3, 2013

fifteen minutes of {washi} crafting

 Anyone that follows my on pinterest can verify, that I am fully embracing my new love for washi tape. I considered giving washi tape is own pinboard, but decided that was a bit much and put it in with crafts. for now.

I had to stop at WalMart to get more {hazelnut} coffee after work, so clearly I had to swing through the stationary isle. While I was there I snagged some binder clips and a clipboard. Spent a whopping like $3.50.

I grabbed my supply of washi tape (stashed in a flower pot from the Target dollar spot), scissors and my purchases and curled up with my favorite fuzzy blanket and some DVR'd Law & Order SVU. It was snowing like crazy, so it really seemed like the best idea for the evening.

so pretty!

The width of my washi tape just happened to perfectly on the smaller clips so I just stuck it on one side, rolled it over and trimmed it off. super simple. The ability to stick, unstick, and restick the tape as many times as I needed to, to get it straight was awesome. You know I was sticking and resticking until I got it perfectly straight on each one :)


love that nasty chipped nail polish don't ya??

The bigger clips didn't fit quite as nice. I tried a few different ways and never really found a way that I liked. But I ended up just overlapping the two pieces of tape and calling it good enough. I thought about cutting it so it fit evenly, but I really wasn't interested in getting that OCD. They are just binder clips that I will probably loose or someone will "steal" off my desk at school.

 Here are the completed smaller ones. adorable!
 And then I just added a few strips to the clipboard, just to brighten it up. I didn't want to crazy and cover the whole thing. And my OCD brain wouldn't let me mix colors. So it's staying a pink clipboard until I can get brave enough to add another color.

 Even though it monochromatic, its still much more fun than a plain old masonite clipboard.
It will be great to keep on my desk at school!


What washi crafts have you done?? Any other brilliant ways of using this oh-so-functional-and-fun tape?


What wonderful ways are you using washi?? share your crafts with us!

Monday, March 25, 2013

My new {mini} menu board

Before we moved to our apartment I had this {diy} menu board hanging in the kitchen:

I was so impressed with myself for making it {read about that here} and I was super disappointed when I didn't really have anywhere to hang it in the new apartment. whomp, whomp.

So I have been living without a menu planning board for the last six months. I have a calendar that I roughly planning my meals out with. But I like the weekly format displayed nicely in the kitchen.
So I was home (to my parents') and remembered that I had this baby from when I lived there. Clearly my momma was not doing any meal planning so I snatched it.

It's nothing fancy. Just a fun piece of scrapbook paper and the word "dinner" cut out with my cricut. and then covered with contact paper (since it didn't fit through my laminator). ps. I chose dinner over supper, because dinner fits nicely without those below the line letters :)

I then made these quick meal cards in Excel.

I went with a simple tone on tone chevron to keep the background simple since my "menu board" was a bold print.

I just printed, cut, laminated, and cut again. Easy peasy. I left a few blank ones for me to try new things and for the old favorites that I have surely forgotten.


I just used these cute magnet tacks that I already had to stick them on to the fridge. I thought about labeling clothes pins with days of the week to clip them to, but decided against it for now. I might decide to do that later? We'll see how this works out.


And then in a burst of genius, I realized that I could stash all the meal cards into the clear plastic case that the magnet tacks came in and stick them on top of the fridge- along with the bf's giant tubs of protein powder. I love useful trash!


Such a simple project and yet it makes me smile every time I go in the kitchen. It solves my menu board dilemma without taking up any space. love that! 
What genius ideas have you come up with lately? Any projects that you've had to "re-do"? Share with us, we love the inspiration!


Wednesday, March 6, 2013

I pinned it & did it {kitchen drawers}

Jen, over at Iheart organizing is working on her kitchen this month, and has motivated us to to do the same! She recently had a guest blogger share her beautiful kitchen, including these lovely drawers:


more organized drawers


 and  I absolutely love these dishes in a drawer with pretty labels!

So, I already mentioned that I made a trip to WalMart and the Dollar Tree in preparation for this project, here. I snagged a few supplies randomly, since I really wasn't sure how any of this was going to work out.

Dollar Tree goodies
Shelf paper from WalMart

I picked the "prettiest" shelf paper that I could find at my WalMart store. This is really a bit more pink and girly than what I wanted, but it will still look nice in my drawers.

I measured the bottoms of my drawers and precut my paper to fit the width. I considered going the other direction, but there was only a tiny bit of space left uncovered in the back, so I went this way to save on wasting a bunch.
I reeeeeaally really wanted to buy a clear acrylic divider for my silverwear so that you could really see the pretty paper through it, but since they aren't at the Dollar Tree, it wasn't in the budget. I may have pouted a bit about that one.

Here's what each of the drawers looked like when I started. Eww right?

No words for this drawer, you just dig until you find what you are looking for.

 
The silverwear drawer actually wasn't too bad. Everything was properly contained in its basket/divider.


Empty baskets= less than useful


Also no words for this drawer. Vitamin packs are taking over!!!
So I emptied out every drawer and piled everything on to the counter. I forgot to snap a picture of this step. I took a timeout in the middle to go to work for a few hours, which meant leaving my kitchen with empty drawers and counters piled full. If someone had walked in, they would have thought a crazy person lives there. But then again, maybe one does? But I digress,
I wiped out each drawer with an antibacterial wipe and let them air dry. Since we live in an apartment, I didn't want to actually stick down the shelf paper only to have to rip it back up when we leave. So I went a little redneck and used tape to stick down the edges, while leaving the backing on.
 My drawers now all looked like this:


I played around with a few arrangements before settling on the final layouts for my drawers. I really tried hard to find a long basket or tray to hold the cooking utensils, but came up empty handed for now.

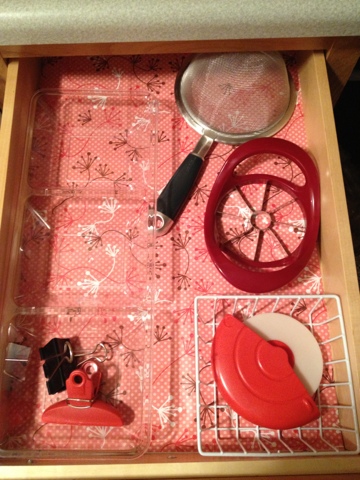
The clear tray on the left is actually a party serving tray, but will hold clips and whatever else I decide to stash in there nicely. I do have more clips, but they are all presently in use. The white wire basket holding the pizza cutter also came from the Dollar Tree. I tried to fit the apple slicer in there too, but no such luck. The strainer tucks nicely into the back of the drawer.


The utensil drawer is looking much better! Even though everything is not in nice baskets like I wanted, it is still more functional than it was before. The black tray moved over from the other drawer to house the few things that would fit. The potato masher got kicked out of this drawer because it always got stuck when you opened the drawer all the way.

Not much changed in this drawer. The vitamin packs got corralled into baskets from the dollar tree and the measuring cups found a new home next to the food scale.


And finally the silver wear drawer gets a little pop of color, and the addition of the potato masher, since this drawer is not usually opened completely, it stashes away safely in the back.

On my Dollar Tree trip, I also grabbed this four pack of clear bowls, thinking I could use them in one of the drawers. But nothing really fit nicely into them. So I popped two of them into the cupboard that also recently got a makeover. (read about that here)


I popped a few packs of gum into one and the loose cough drops into another. We have been popping a lot of these lately, so being able to grab one easily is nice right now. I'm sure I will find a use for the two extra bowls somewhere....

I am loving the pretty pop of color every time I open a drawer now! What have you done to brighten up or organize your kitchen? Are you participating in Jen's kitchen challenge this month?